Introduction
For those who don’t know, one of the ways that compression formats (MPG, MP4, etc) achieve a high level of compression is by detecting motion from frame to frame. Basically, instead of encoding the whole image, algorithms can instead reference similar blocks from previously encoded images, which take a lot less space to encode.
I just added new features in FunscriptToolbox (FSTB) that take advantage of this to simplify the creation of scripts. In short, FSTB can extract motion vectors from a video and create an optimized .mvs file that can be used by a new OFS plugin. The FSTB plugin has the ability to learn “rules” from already scripted actions, and can then generate new actions based on those rules, and it usually takes less than a second to do it. In some way, this is almost like an ‘auto-complete’ feature for scripting. The plugin is also able to adjust all the generated actions as ‘one unit’ instead of individually, which is a lot more efficient.
In short, the process looks like this:

Note:
Like all tools that try to generate .funscript automatically, it will not create perfect scripts. The goal is to automate things that a computer can do better, like detecting movement, while leaving the rest of the decisions to the scripter.
Initial setup
-
Download FunscriptToolbox on github (version 1.2.0 or later)
-
Unzip the archive somewhere (for example, C:\Tools\FunscriptToolbox).
-
Double-click on --FSTB-Installation.bat
This will install the plugin in OFS extensions directory.
This will also create a few ‘use-case’ folders.
The one that is needed for the plugin is “FSTB-PrepareVideoForOFS”.
You can leave the folders there, or move them somewhere else, the script inside will still work if they are moved.Note: If you move the “FunscriptToolbox” folder in the future, you will have to re-run --FSTB-Installation.bat to update the plugins and ‘use-case’ scripts.
Demo
-
Download the files from (please import if you can):
-
Open OFS
-
Enable the plugin and windows (menu: Extensions\FunscriptToolbox.MotionVectors)
-
Open ‘Position-CowGirlUpright-MenLaying-C .mp4’ in OFS
This should also load the prepared .funscript (which contains only a few actions). -
Select the menu “Project\Pick different media”.
-
Select “Position-CowGirlUpright-MenLaying-C .mvs-visual.mp4”. This is optional but it will allow you to see the ‘motion vector’ and understand a little bit better how to plugin makes its decision.
-
Place the video at the end of the first series of strokes that I included and click on “Create”
-
This should open this window:
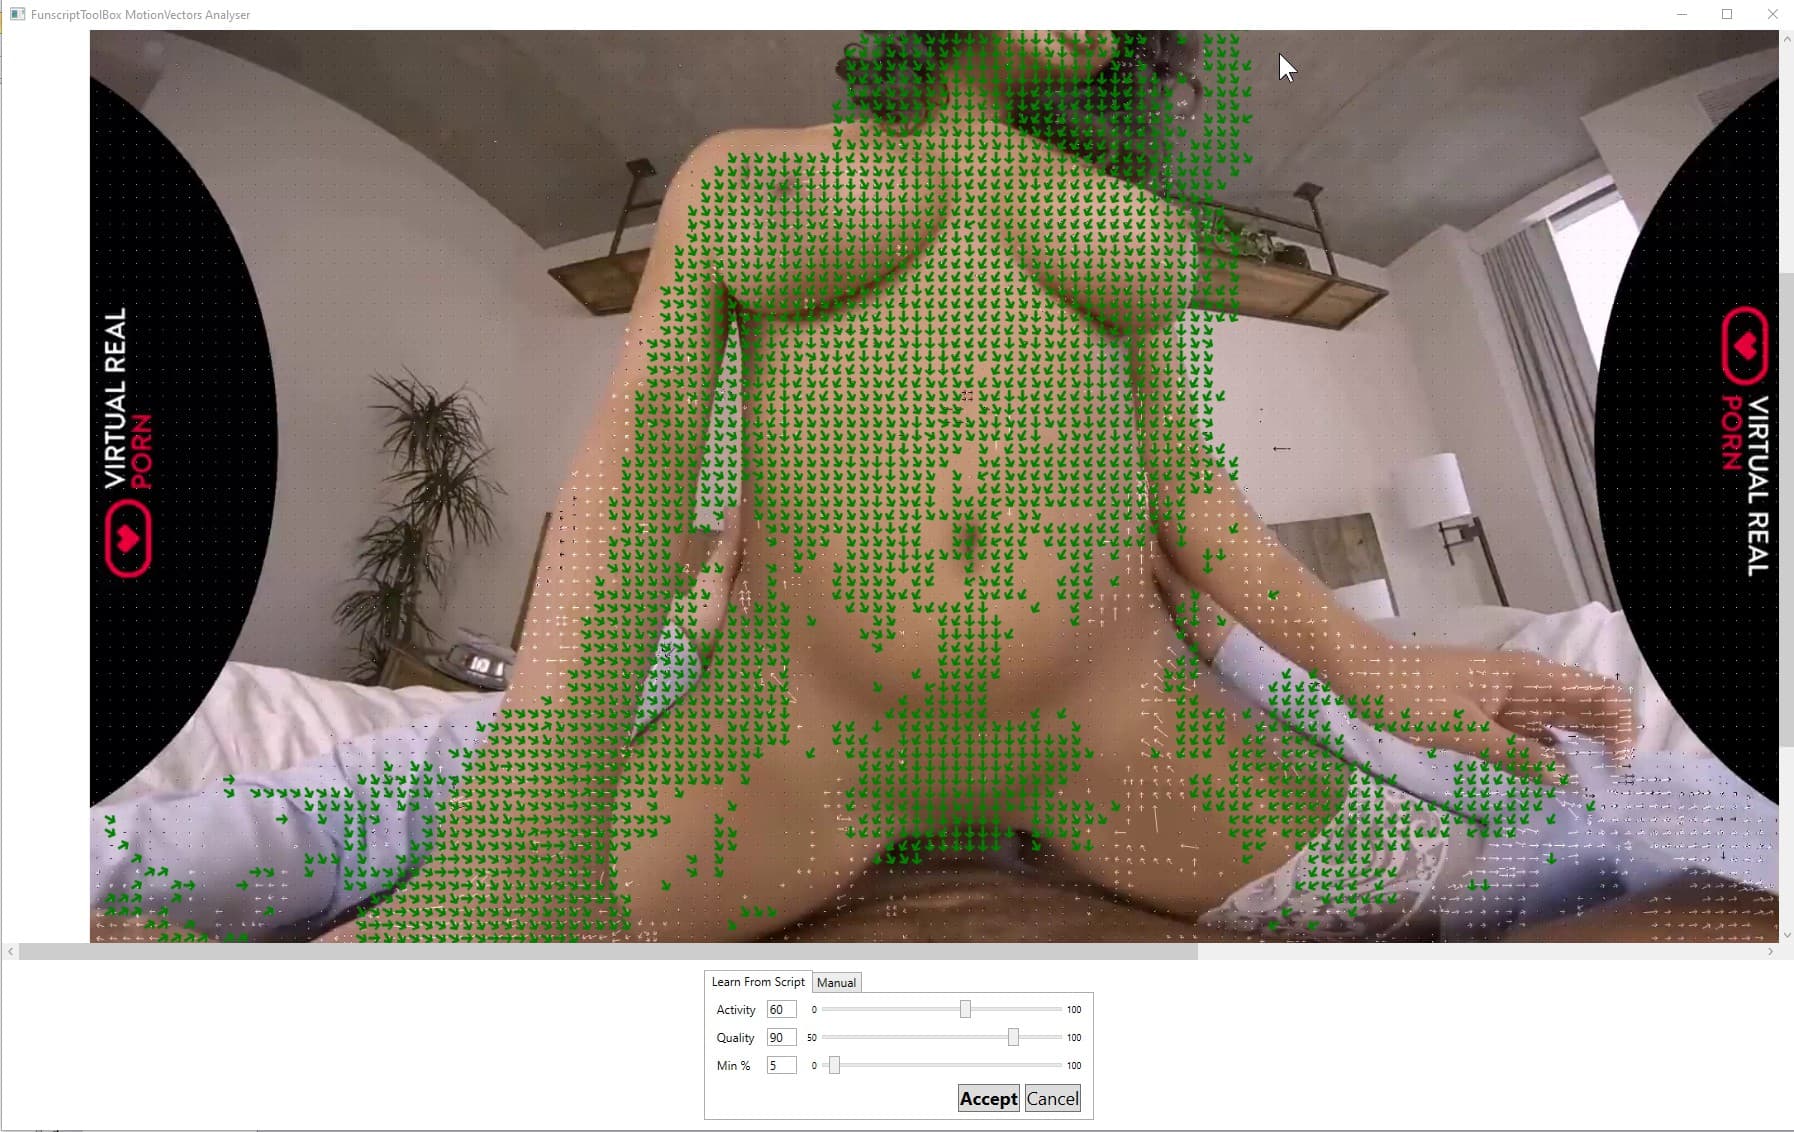
Note: the virtual canvas is kind of crappy but you should be able to pan and zoom.It shows the analysis of the scripted strokes. The green vectors shown are the ones that “agree” with the script over 90% of the time (i.e. script was going up or down, and the motion vectors extracted from the video were going in the same direction as the arrow or in the opposite direction accordingly).
If you want, you can place all sliders to the left (value 0, 50, 0) and move them to see how it impacts the rules (i.e. 1 green arrow => 1 rule that will be used to generate the script).
- Activity: percentage of time where there was movement in the square. For example, in the background, the activity is usually really low.
- Quality: % of the time that the motion vectors agreed with the script.
- Min %: If the activity and quality filter leave less than this % of the rules, add the best quality until we reach this %.
There is also a manual mode where you draw a square that you want to track and input the direction of the movement that you expect (value: 0 to 11, think of the hours on a clock). So far, I haven’t found a great use for the manual mode. I find the ‘learn from script’ mode more useful.
-
When done, click on “Accept”.
-
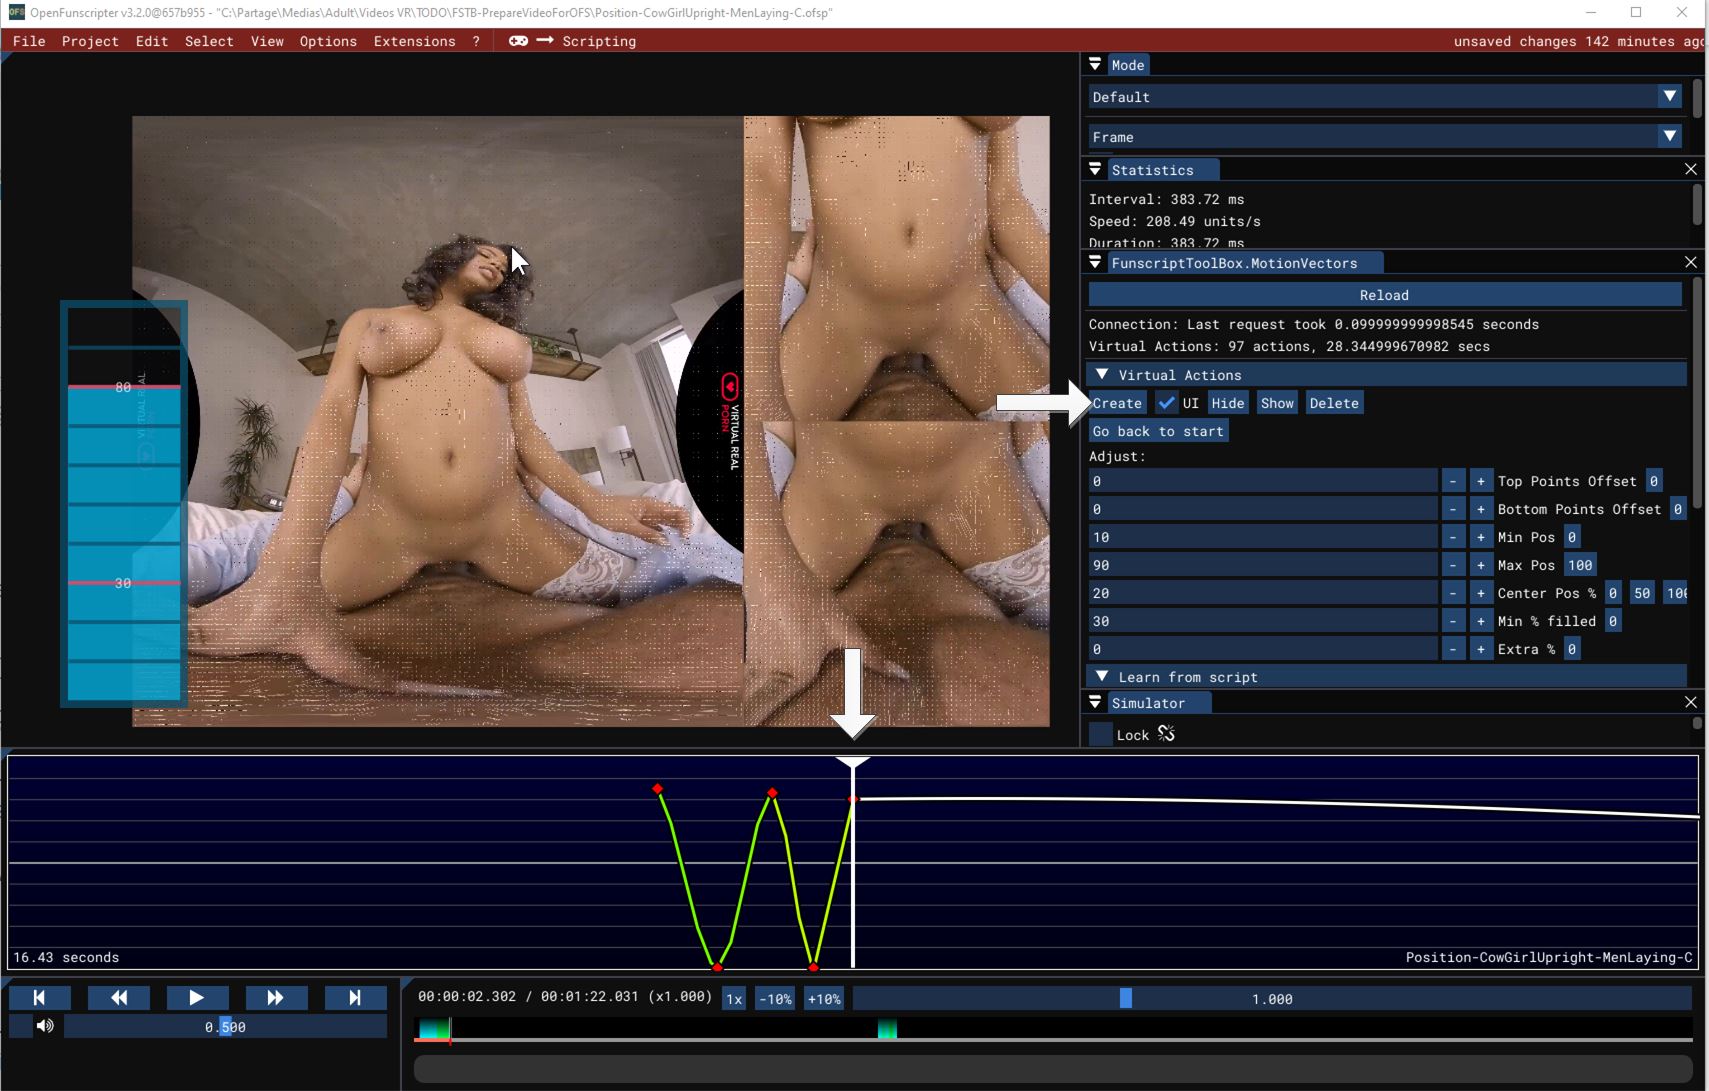
Back in OFS, the application will have generated the actions based on the rules extracted from the scripted actions.
Those actions are ‘virtual’, in the sense that you can adjust them as a ‘unit’ using the “Virtual Actions” settings (top point offset, bottom point offset, etc). You can also hide/show/delete them if needed.
An action stop being “virtual” as soon as a change is made later in the video. For example, if you moved past the first 10 generated actions and, then, you make a change to one of the settings (ex. change 'Min Pos), the first 10 actions will not be changed, only the following actions will be impacted by the change.
-
You can “play” with the Virtual Actions settings to see how they impact the virtual actions.
-
Move to the last actions in the timeline. I included a few scripted actions in the original script because the actions change from a basic up and down to a grinding movement. This is something that you should have detected and corrected like I did while validating the generated actions.
By default, the plugin analyses the last 10 seconds of actions (configurable). But, in this case, this is not what we want because we only have 1-2 seconds of grinding actions and 8 seconds of the ‘wrong type of movement’. To fix that, you need to select the ‘grinding’ actions in OFS and then click on Create. This will tell the plugin to use the selected actions instead of the last 10 seconds.
-
Once you get the generated points back, you’ll notice that the quality of the generated script degrades after 10-15 strokes. When that happens, I usually get to where the script is degrading and try to redo a “Create”. This will relearn rules based on the last 10 seconds (instead of only 1 or 2 strokes) which usually makes it better.
Getting Started with a real video
-
Move the video that you want to script into the “FSTB-PrepareVideoForOFS” folder.
-
If it’s a 2D scene, change in the .bat file,
--ffmpegfilter=VRMosaic
to
--ffmpegfilter=2D -
Double-click on: --FSTB-PrepareVideoForOFS.version.bat
-
This will prepare the video for the plugin.
Depending on your machine, it can take a while. On my old machine (intel i7700), converting a VR video took about 7 times the duration of a video (30 min => 3h30). On my new machine (intel i13900K), the same video takes about 75% of the duration of a video (30 min => ~23min, almost 10 times faster).It will:
a. Reencode the video with mostly only P-Frames (which give better motion vectors).
b. Extract the motion vectors from the P-Frames in a .mvs file (a custom format that I created).
c. Reencode the P-Frames video with ‘visual motion vector’ and with only I-Frames for OFS. -
Open your video in OFS, like the demo above.
FAQ (that no one really asked)
The original video already contains motion vectors, why do we need to reencode it?
The problem is that the original video is compressed to favor size and convenience. It has a lot of I-frames that can be decoded as-is so that a video player can skip ahead without having to decode multiple frames to show an image. And it has a lot of B-frames that reduce the file size because they take up the least amount of space.
In short, the compression works like this:
- I-frames are not using blocks from others frames. So, for our purpose, they don’t contain motion vectors, which is bad.
- P-frames are using blocks from the previous I-or-P-frames, which might be more than a frame away which is also bad (there might be a direction change in those frames).
- B-frames are using blocks from the previous I-or-P-frames and from the future I-or-P-frames, which might be more than a frame away which is also bad.

To get the best result, we need to have motion vectors that are always related to the previous frame only. Reencoding the video without any B-frames and with as few as possible I-frames gives us that.

How do the virtual actions adjusting work exactly?
When the server creates virtual actions, it only generates the direction and amplitude of a movement on a 100 points scale (i.e. 100 points up, 50 points down, etc) without any information on the exact starting or ending position. The server doesn’t know if it’s from 0 to 50 or 10 to 60 or 50 to 100.
It’s the job of the plugin, with the scripter’s help, to create the final positions for the actions. Using the default settings of Min Pos=0, Max Pos=100, and Center Pos %=50, the plugin will simply create a wave centered in the middle.


To be able to shape the generated actions, the scripter can:
- Change ‘Top Points offset’ to move only the top points to the left (value < 0) or right (value > 0). ‘Bottom Points offset’ does the same for bottom points.
- Change the minimum or maximum position of the wave.
- ‘Center Pos %’ will change the center position of the wave. More precisely, it will place the specified % of ‘empty space’ below the wave.
- ‘Min % filled’ will expand the length of all movements by a specific value.
- ‘Extra %’ is similar to ‘Min % filled’ but is a multiplication. So, small values will expand a little bit, and bigger values will expand more.
For example:
-
Min Pos = 0, Max Pos = 80, Center Pos % = 0, Min Filled % = 20 would give this:

-
Min Pos = 10, Max Pos = 90, Center Pos % = 20 would give this:

Notice how the points are all shifted toward the lower part of the range but they don’t create a ‘hard line’ at the minimum position.
Versions
1.2.5
- Fixed some verbs that didn’t download ffmpeg (ex. as.cfs). If you tried that verb first after installation, it would fail with an error “cannot find ffmpeg”.
- Fixed script “–FSTB-GenericCmd.1.1.bat” (which contained my local path, instead of the path on your machine).
- AudioSync verbs: Rewrote “audiosync.createfunscript” verb to be more flexible. You can now use multiple inputs and/or multiple outputs. The tool will “virtually” merge the inputs and output for the comparison and then unmerge them to create the final funscript/srt file. It also synchronizes all .funscript / .srt linked to the file (ex. .funscript, .roll.funscript, .pitch.funscript, .srt, .jp.srt, etc).
For example, you can use a pattern * in the filename like this:
FunscriptToolbox as.cfs -i 3DSVR-0628-*.mp4 -o 19512.mp4
This will load and merge all .funscript / .srt linked to files “3DSVR-0628-A.mp4”, “3DSVR-0628-B.mp4”, etc and create .funscript / .srt synced to the file 19512.mp4.
It also works with one input and multiple outputs, or with multiple inputs and outputs.
The files can also be listed individually, separated by “;”.
For example, FunscriptToolbox as.cfs -i 3DSVR-0628-A.mp4;3DSVR-0628-B.mp4;3DSVR-0628-C.mp4 -o 19512.mp4
1.2.4
- OFS Plugin: Added the possibility to set the default values for the “adjust” settings.
- OFS Plugin: Added the possibility to reset all the “adjust” settings to the default.
- OFS Plugin: Added the possibility to automatically reset some of the “adjust” settings when creating virtual points (i.e. the checked “R” will be reset).
- OFS Plugin: Minimum Percentage can now be lower than 1.
- OFS Plugin: Fixed the channel locking mechanism. You should be able to use the plugin in multiple OFS opened at the same time.
Since the plugin has been updated, make sure to start --FSTB-Installation.bat to update it.
1.2.3
- OFS Plugin: Fixed bug where some actions were not “unvirtualized”. For example, if you generated actions then move ahead without making a change then click on increment ‘top offset’ twice. The first increment would affect all the actions, even the one behind the current time, and the second was only affecting the future action, as it should.
- OFS Plugin: Added better “debug logs”.
1.2.2
- OFS Plugin: Fixed bug in “create rule” request when no actions could be found.
- OFS Plugin: Fixed UI when using in an older version of OFS (before 3.2, ofs.CollapsingHeader not available).
- OFS Plugin: Added an error message if FunscriptToolbox.exe could not be found, with a tooltip on how to fix the problem.
- OFS Plugin: Added an error message in OFS if the server returns an error message for a request.
- OFS plugin: if the video file cannot be found or if there is an error while extracting a screenshot, show the UI anyway with a black screen.
- AudioSync verbs: Transform chapter time when creating a synchronized script. Also, if a .srt file is found, transform the time also (forgotten change from a previous release).
- Installation verb: Added a new use-case folder: VerifyDownloadedScripts to see if your video is in sync with the script (only if the original script contained an AudioSignature).
- Installation verb: Added script --FSTB-GenericCmd.bat in all the use-case folder, this simply open a command prompt with FunscriptToolbox folder in the path.
1.2.1
- Frames were not cached correctly on the server. The same frames had to be read on each request, eating memory that had to be garbage collected.
- Removed the validation that height needs to be divisible by 16
1.2.0
- First release of the plugin.


