XBVR is a streaming media server application that takes VR Videos/Funscripts and provides an easy playback/browsing experience.
Per poll results, we will be starting with a guide based around Windows. A Linux/Docker/NAS version will be added later, but you can export your config from Windows over to Docker later if you want to get started now!
Prerequisites
- Windows PC with local VR video files or access to them via a network share/NAS
- LAN IP Address of your PC (Use a static IP if possible)
#1: Initial XBVR Setup


- Download the latest XBVR Windows_amd64.zip from the Releases page (https://github.com/xbapps/xbvr/releases) Extract the Zip file to a location on your computer (This will be where you run XBVR from, it does not “install”)
- Run XBVR.exe (Allow some time for first startup)
-
- If you get a “Windows SmartScreen” warning click “More Info”-> “Run anyway”
-
- If you get a “Windows Firewall” popup click “Allow Access”
- Open XBVR in your web browser (http://127.0.0.1:9999)
#2: Set up Scrapers

Scrapers gather the scene/actor data from VR sites which XBVR matches to your files and uses to provide thumbnails, descriptions, etc.
- OPTIONAL – See Advanced Setup #1 below to speed up initial scraping
- Go to Options (top menu) → Scrapers (left menu)
- Toggle “Enabled” for any sites you have videos for
-
- I do not recommend doing all sites as this will use unnecessary disk space/make scraping take extremely long
- Click “Run selected scrapers”
- Allow scraping to complete (Monitor on upper-right, this will take some time so recommend getting a drink, etc.)
#3: Set up Scripts/Videos

Here we tell XBVR where your videos/funscripts are located
- Go to Options (top menu) → Storage (left menu)
- Under “Path to folder with content” enter a path on your computer that contains your video/funscript files
-
- You can add multiple paths if you have your files in multiple locations
-
- If your files are on a NAS, you can use a mapped drive path instead
- Click “Rescan all folders”
- Allow the scanning to complete (Monitor on upper-right)
#4: Match your Videos and Funscripts to Scenes


This is the tedious part of setup. If you kept default file names from studios, you may have a lot automatically matched… for everything else (such as my entire library since I use a standard naming convention) you’ll have to match them yourself.
- Click on “Files” (top menu) then select “Unmatched”
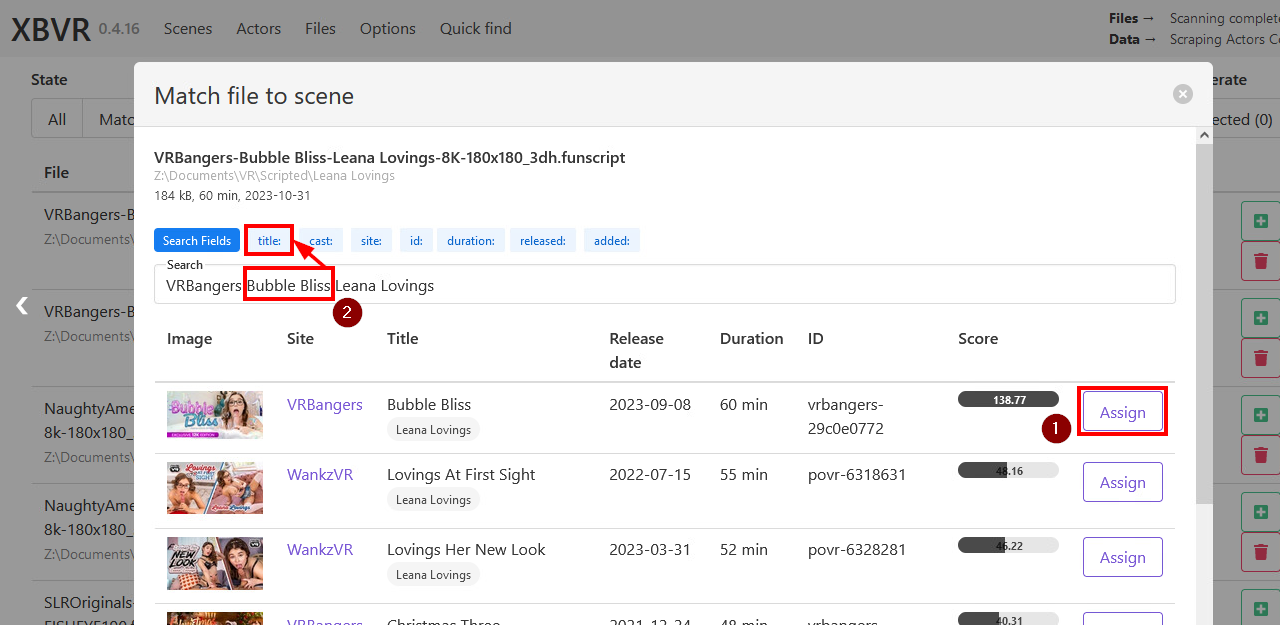
- Click “Match” on the first file
- If you see the correct scene displayed, click “Assign”
-
- If not, select a portion of the text for the studio, scene title, actress, etc. and use the respective button above the search field to narrow the search, then “Assign”. You can also enter your own text in to the search field
-
- If you cannot find a match, use the left/right arrows to move to the next file (you can set up manual scrapers/manual scenes later, there should generally be very few that won’t match to something)
#5: Start Using XBVR

At this point XBVR is set up and running on your PC, it’s time to test everything in VR!
- Open HereSphere on your headset
- Access the HereSphere Web Browser and go to http://your-pc-ip:9999/heresphere
-
- For DeoVR simply go to http://your-pc-ip:9999
- Browse and play your videos!
-
- If the video has an associated Funscript (Step #4), it will play automatically in HereSphere/Deo once you have a toy connected